|
|
|
|
|
|
|
Change Strings |
Tuning |
Action Height |
Pickup Height |
Care & Cleaning |
|
This method is one of the easiest and quickest that can be performed without the aid of additional string winding devices, and is intended for guitars that do not have Floyd Rose type tremelos or other systems that have locking parts, though with a little initiative I'm sure they could be adapted.
|
|
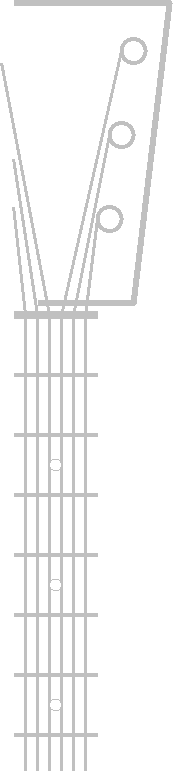
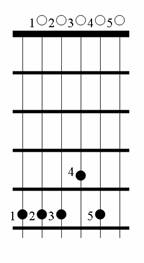
A good quality guitar fitted with quality sealed unit tuners (such as the ones fitted to all Steen Guitars) should hold its tune through all the rigours of normal guitar playing and gigging, string bending, over enthusiastic strumming etc. However it will still be necessary to tune your guitar from time to time because of a number of different factors. Excessive use of the tremelo can lead to the strings being stretched, changes in temperature and humidity can affect the amount of bend on the neck as the wood expands and contracts, the inside of some gig bags can even catch on the tuners and change the tune of your guitar. There are a number of different techniques you can use to tune your guitar, by far the easiest and most accurate being to use a chromatic tuner which plugs straight into your guitar and shows the note of a plucked string on a small screen. The tuner indicates whether the note is flat or sharp and it's a relatively simple job to adjust the string to perfect pitch. The following instructions describe one of the easiest methods of tuning without using a chromatic tuner, for standard tuning (E, A, D, G, B, E). It is known as Relative String Tuning and although no other devices are necessary you do need a source reference note eg an E played on a piano, or notes played on tuning pipes. Once one reference note is played and matched to a string all the other strings can be tuned to that string. Relative String Tuning Relative tuning follows the pattern shown below:
The black circles indicate where the string should be fretted (pressed down), white circles mean the string should be plucked open, ie no fretting. The numbers indicate where the notes will be the same. For example the note produced by the bottom E string fretted at the 5th fret should be identical to the note produced by the next A string played open. You should tune the strings accordingly, and so long as one string is matched to a reference note all strings should be in tune. |
|
String height above the fret board is an important factor that largely determines how difficult a guitar is to play. A high action can make it very difficult, especially for beginners, to hold down chords or play fast solo runs up the fret board. If the guitar has heavy gauge strings as well then it may be necessary to go on a body building course and have steel tips added to your fingers before you can play your favourite rock tune. It is much easier to play a guitar with low action, but the lower the action the more precisely the guitar has to be engineered and set up. On many cheaper guitars it is impossible to set a low action because the quality of the build, the angle of the neck, height of the nut etc. means that the strings always buzz on the upper frets, or their sound is deadened as the player plays further up the neck. These problems can be alleviated a little by adjusting the angle of the neck via the torsion bar, but a poorly designed guitar will never achieve good tone and low action simultaneously. Steen guitars are designed and built to a very fine specification so it should be possible to achieve a comfortable low action, clear ringing tone and long sustain. Listed here are instructions that show the user how to make basic adjustments. Adjusting The Torsion Bar/Truss Rod The torsion bar that runs down the centre of the neck is there to counter the bending effect of the strings when they are under tension. Without the torsion bar the neck would be bowed up at the headstock leading to a high and difficult to play action further up the neck. It is important that the torsion is set correctly, if is too slack the neck bows up leading to a difficult action, if it is too tight the neck bows the other way and leads to string buzzing and deadening tone. The Torsion Bar adjusting nut is usually found at the base of the headstock, often under a small plastic cover. It is usually an inverted hex which requires an Allen key to turn it.
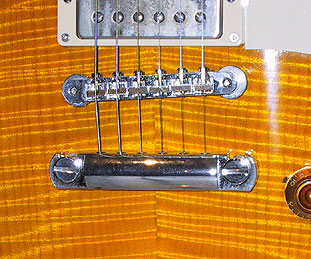
Adjusting Bridge Height If you want to adjust string height it is normally here that you will do it, assuming that both nut height and torsion bar are set correctly. The instructions given here cover two types of design, the Gibson style Tunomatic, and the Fender style vintage tremelo. Tunomatic The Tunomatic style bridge is supported on 2 posts that screw into the guitar body, resting on threaded wheels. By turning these wheels the height of the bridge can be adjusted as they screw up and down the posts. You should set the strings at a height that is comfortable for you, ensuring that the tone of the plucked strings remains clear when fretted in any position on the neck, and that there is no fret string buzz. Also remember that the strings will need to be retuned after you've altered the height. "By turning these wheels the height of the bridge can be adjusted"
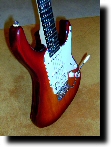
Fender Trem A Fender style trem unit has height adjustable screws on each saddle that supports a string, so the height of each string can be adjusted independently. This can be achieved reasonably easily with the use of a small screwdriver, being careful not to damage the chrome or nickel coating. The same considerations apply as given above for the Tunomatic. Nut Adjustment In general the height of the bottom of the string groove should be about the same height as the first fret, though makers usually air on the side of caution and cut the grooves a little higher. It is not recommended for the none professional to adjust the height of the grooves as their width needs to be matched to the string width and this requires the use of specialist files or saws. |
|
In general, the closer the strings are to the pickups the higher the output that will be induced in the pickup, but this only works up to a point as the closer the strings are the more the magnets from the pickups 'attract' the strings and prevent them from vibrating freely, reducing output and dulling the sound. The height should therefore be set such that the output is maximised without experiencing problems from magnetic pull. The height settings given below should provide a guide for players but it should be remembered that all guitars with different pickups and different magnets will have slightly different characteristics. It should also be noted that the tendancy of single coils to hum will be increased by the close proximity of the strings.
NB: Most pickup heights can be easily adjusted by adjusting screws at either side of the pickup, P90 Soapbar pickups however cannot be adjusted. Also beware not to lower the pickups too far as they may come off the screw thread and drop into the guitar body. |
|
Although Steen Guitars are made to a high standard, all makes of guitar benefit from regular care and routine cleaning.
|
![]()
![]()
![]()
![]()
![]()